
")


")
If you’re a Sedona first timer, a Devil’s Bridge sunrise should have been on your bucket list like yesterday.
Duh!
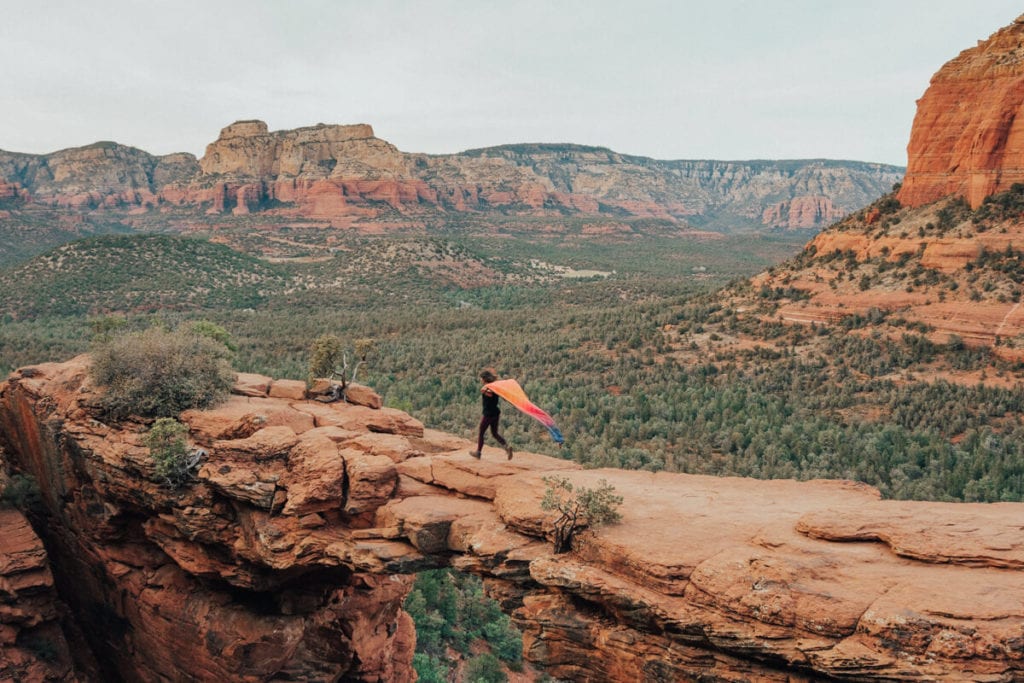
Devil’s Bridge is notably one, if not THE most popular, Sedona, Arizona landmark. I mean, who doesn’t love a natural bridge you can cross at your own risk?
HA. Kidding.
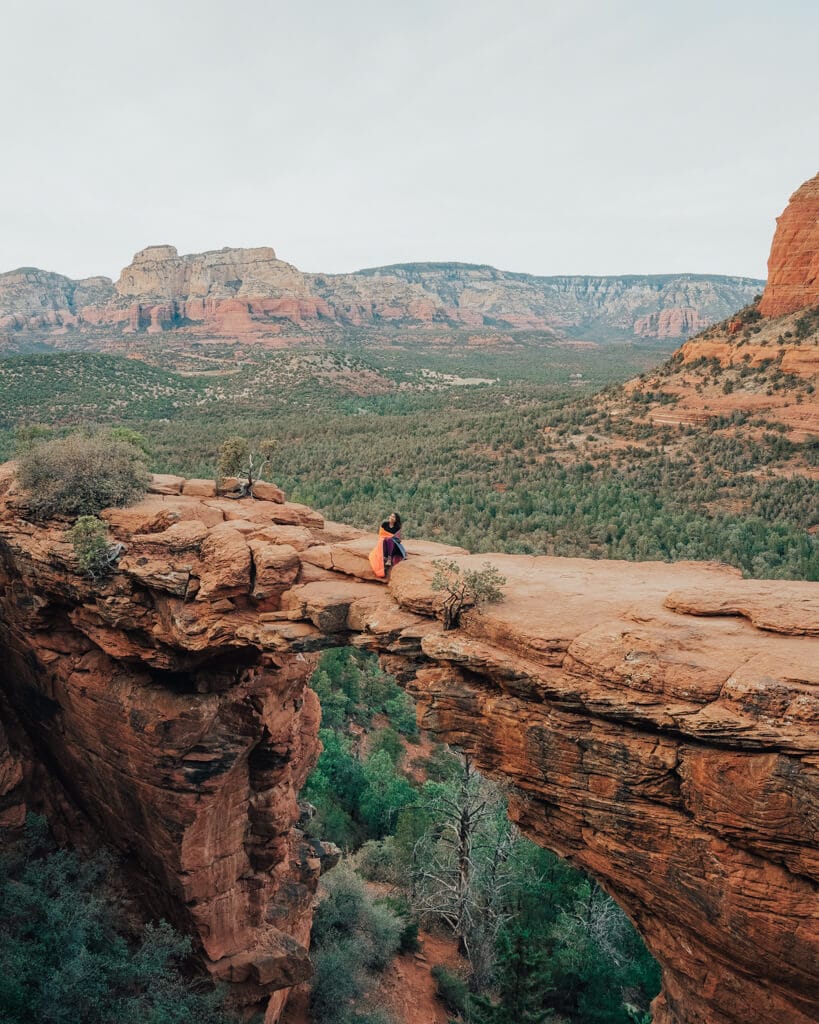
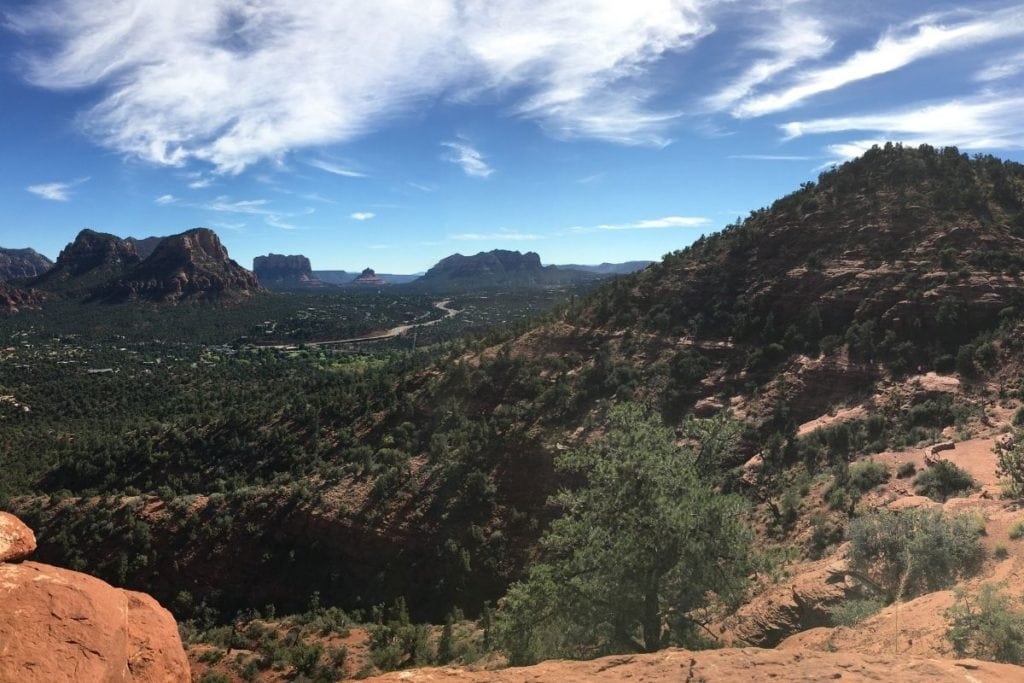
The structure of Devil’s Bridge is what makes it unique, but its red rock surroundings are breathtaking as well.
In this blog, we will cover what to expect on the trail. Then we’ll discuss what a Devil’s Bridge sunrise hike could look like for you.
If you haven’t already, make sure you also check out my other Sedona blogs:
- The Best Sedona Hikes for Sunrise and Sunset
- Most Instagrammable Places in Sedona
- Sedona 3 Day Itinerary
- Best Sedona Vacation Rentals
- Sedona Travel Guide for First Timers
With that, let’s get into the blog!
FREE CLASS: Get PAID to Travel!
Sign up for my free class and learn how I land paid brand deals that pay me to travel as a content creator and influencer!
Planning Your Hike Up Devil’s Bridge
- ❓Is Devil’s Bridge Safe? Yes! Hiking on Devil’s Bridge Trail is safe. Millions of people visit Sedona, AZ, and hike Devil’s Bridge every year. Stay away from the cliff edge, and you will be safe.
- ⛈When to Avoid: Devil’s Bridge can become slick after rain or snow, so please try to avoid going on a Devil’s Bridge sunrise adventure during or directly after lousy weather!
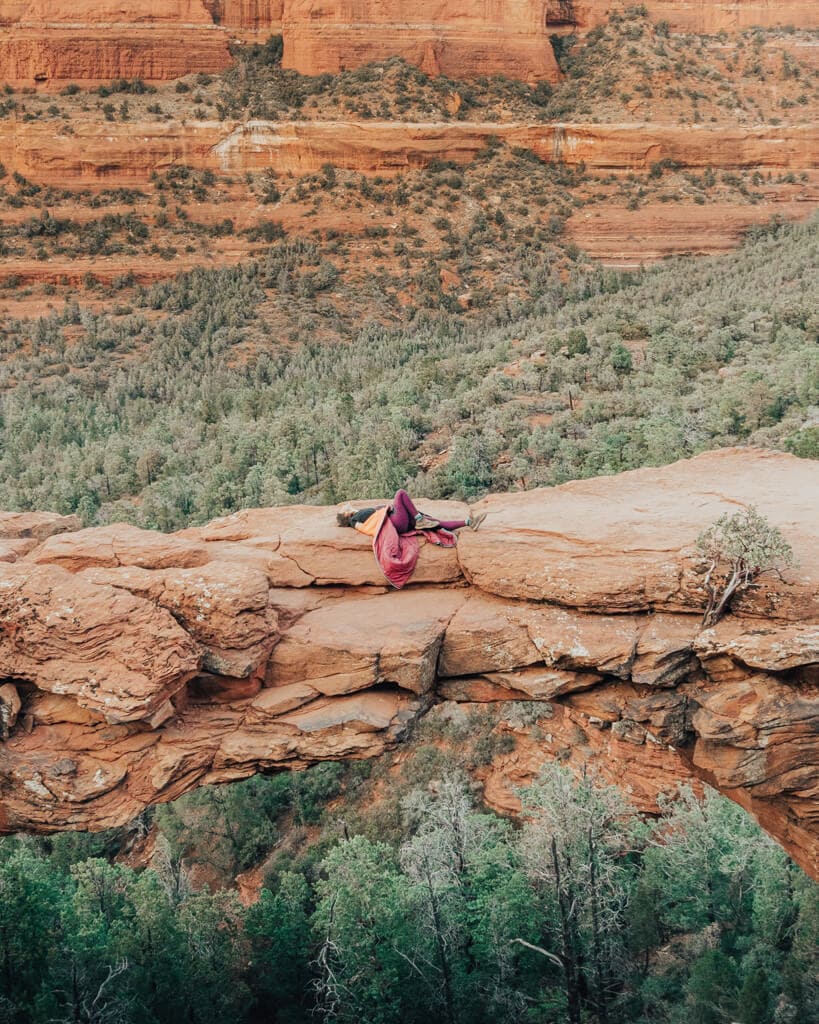
- 🌵How High is Devil’s Bridge? Devil’s Bridge stands at 54 feet tall and 45 feet long!
- 🚙4×4 Rental Cars: Check RentalCars.com for vehicle rentals!
- 🌞Best Time to Hike: The best months to hike Devil’s Bridge Sedona are October through April.
In my opinion, try to hike to Devil’s Bridge for sunrise if you can! During sunrise, the whole valley behind Devil’s Bridge lights up.
Should you choose to hike Devil’s Bridge for sunrise, please make sure you start your hike almost an hour before the sun is supposed to come up.
You will want time to make sure you can both relax and enjoy the sunrise, but also make your way to Devil’s Bridge with no issues. It’s an easy addition to any Sedona itinerary and you’ll love it!
And yes! Devil’s Bridge Trail is dog-friendly. However, the trail can be steep and narrow at times. Please make sure your dog has trail experience. Dogs are also required to be on a leash. An easier hike for dogs might be Doe Mountain trail at sunrise!
*New* Sedona Shuttle
As a side note, in spring 2022 Sedona implemented a free shuttle system to take hikers to and from certain trailheads, including those that take you to Devil’s Bridge. The shuttle operates year round, Thursday through Sunday.
Plan your hikes accordingly! When the shuttle is running, you will NOT be able to park at the trailhead lots for Devil’s Bridge.
Read more on SedonaShuttle.com.
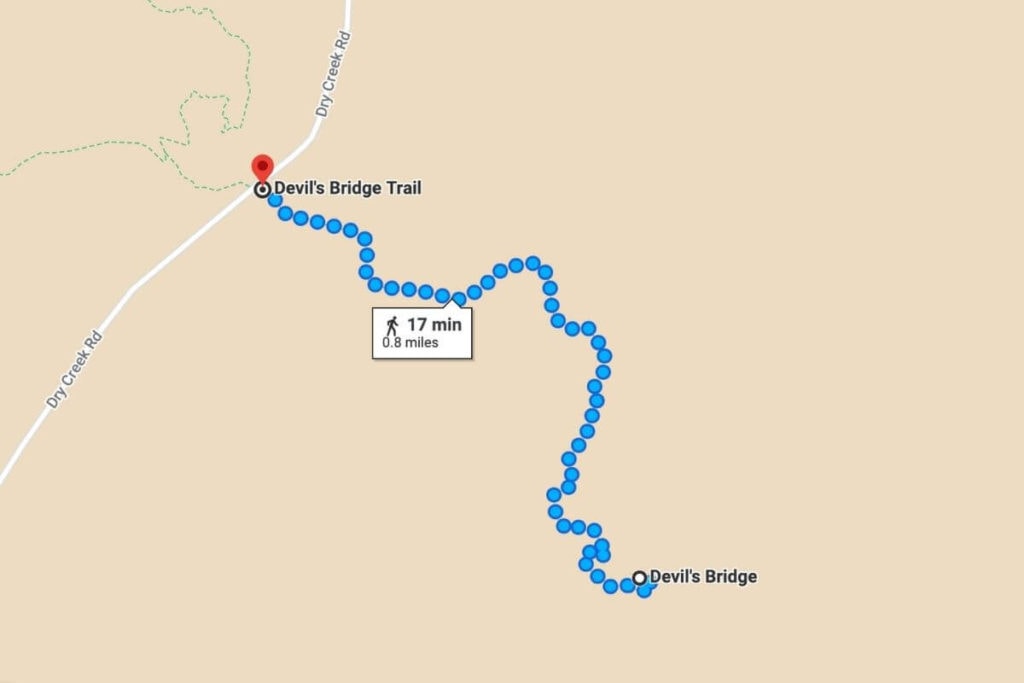
Devil’s Bridge Trail Details
- Devil’s Bridge Trail to Devil’s Bridge: 2 miles round trip
- Elevation Gain: about 400 feet
- Difficulty: Easy (one uphill section to the top with steps)
- Best Time To Hike: Best Sedona trail for sunrise
- Trailhead Location: 34.90275, -111.81378
- Red Rock Pass: Without a 4×4, you will have to purchase a $5 Red Rock Pass. If you have an America The Beautiful Pass, you can use that instead!
The Devil’s Bridge Trail is considered easy to moderate because there is a bit of an uphill hike to the Bridge. There is also a way to see Devil’s Bridge from below, which I’ll talk about later.
Viewing it from the lower perspective will reduce the amount of uphill you have to complete on the Devil’s Bridge hike. BUT, from personal experience, climbing to the top to see the Bridge from above will give you the best view! It’s worth the climb if you’re a Sedona first-timer!
How to Get to Devil’s Bridge Trailhead
Did you see that map I shared? Devil’s Bridge TRAIL is literally in the middle of nowhere.
So, to enjoy a Devil’s Bridge sunrise, or hike in general, you first have to go on a little adventure.
There are various ways to get to Devil’s Bridge Trail. They include driving to the trailhead via a 4×4 vehicle or hiking to the trailhead from a DIFFERENT trail.
Let’s discuss your options!
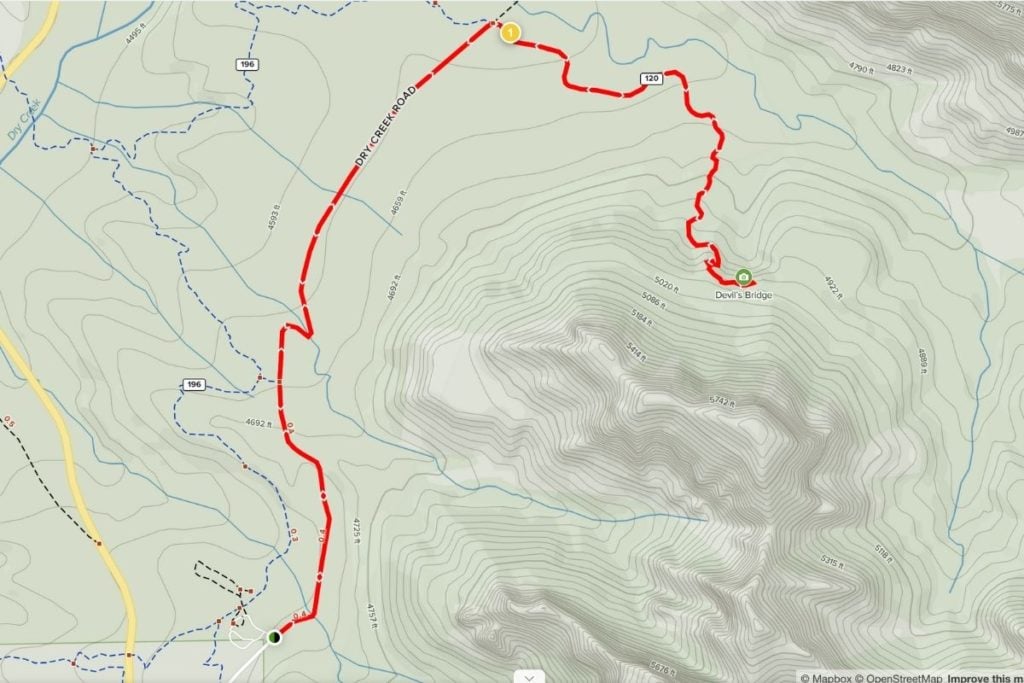
Driving a 4×4 to Devil’s Bridge Trail
- Devil’s Bridge Trailhead Parking Lot: 34.90275, -111.81378
- Dry Creek Road to Devil’s Bridge Trail: 1.1 miles one way
Your first option for getting to Devil’s Bridge Trail is by a 4×4 vehicle. If you have a high clearance, 4×4, you can drive down Dry Creek Road, park in a little dirt lot for Devil’s Bridge Trail, and follow the signs straight up to Devil’s Bridge.
Doing this will cut your hike down, making it 2.2 miles round trip. Sedona runs Pink Jeep tours, and the jeeps almost always drive up Dry Creek Road, so you will be sharing the road with them.
Hiking to Devil’s Bridge Trail
Your next option to catch a Devil’s Bridge sunrise is to park at the ever so popular Dry Creek Vista trailhead parking lot and complete your hike by walking Dry Creek Road, OR you can take the more scenic Chuck Wagon and Mescal Trails.
Here’s what you need to know about hiking to Devil’s Bridge Trail via Dry Creek Road, Chuck Wagon Trail, or Mescal Trail.
Dry Creek Road to Devil’s Bridge Trail
- Parking Lot: Chuck Wagon parking lot (available Monday through Wednesday)
- Shuttle Stop: Head to SedonaShuttle.com (available Thursday through Sunday)
- Dry Creek Road to Devil’s Bridge Trail: 1.1 miles one way
- Dry Creek Road to Devil’s Bridge Trail to Devil’s Bridge: 2.1 miles one way; 4.2 miles RT
- Your Route: Dry Creek Road > Devil’s Bridge Trail > Devil’s Bridge
Of all the options you have to hike Devil’s Bridge trail, taking a walk along Dry Creek Road is the easiest route! Walking Dry Creek Road will make your hike to catch a Devil’s Bridge sunrise 4.2 miles out and back.
Your hike won’t be the most scenic but gets the job done. Dry Creek road is bumpy, but the elevation gain will be minimal until you reach the parking lot that 4×4 vehicles stop in.
There, you’ll start your ascent up to Devil’s Bridge via Devil’s Bridge Trail. Choose this route because you just want to get to Devil’s Bridge and enjoy the quickest, flattest route there.
Chuck Wagon Trail to Devil’s Bridge Trail
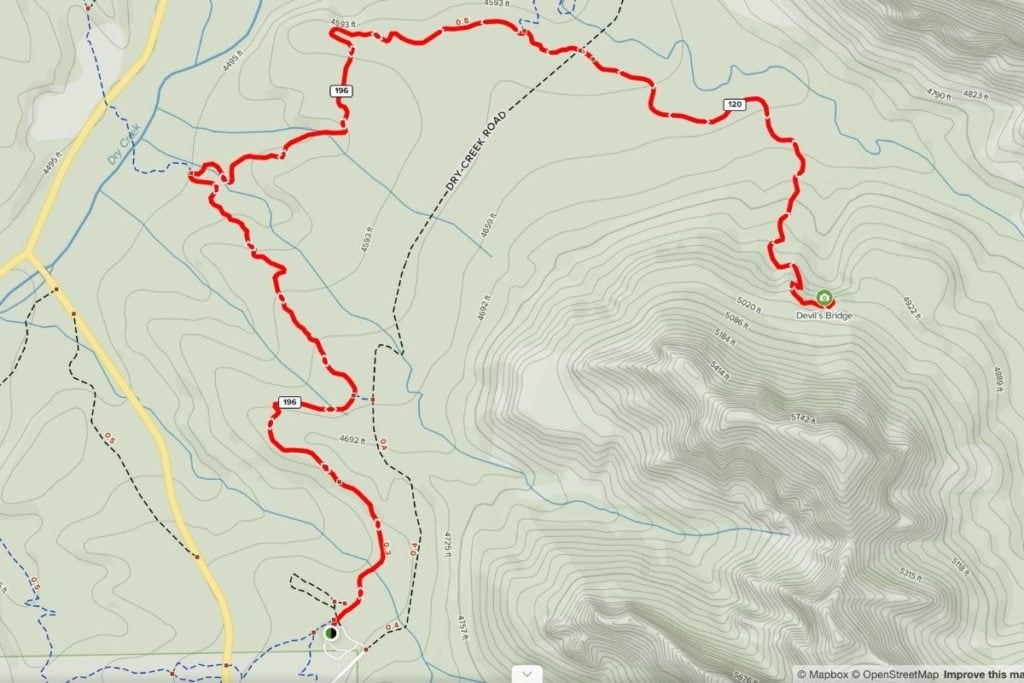
- Parking Lot: Chuck Wagon parking lot (available Monday through Wednesday)
- Shuttle Stop: Head to SedonaShuttle.com (available Thursday through Sunday)
- Chuck Wagon to Devil’s Bridge Trail: 2 miles one way
- Chuck Wagon to Devil’s Bridge Trail to Devil’s Bridge: 3 miles one way; 6 miles RT
- Your Route: Chuck Wagon Trail > Devil’s Bridge Trail > Devil’s Bridge
Chuck Wagon to Devil’s Bridge Trail is the second most popular option for catching a Devil’s Bridge sunrise because it’s in the same parking lot as Dry Creek Road. Once parked, hike Chuck Wagon to Devil’s Bridge for about 6 miles roundtrip.
The trail features various desert plants and classic Sedona red rock surroundings. Chuck Wagon trail is well marked, leading to Devil’s Bridge Trail.
It’s also relatively flat, which is an added bonus! Should you choose this option, you’ll walk Chuck Wagon for 2 miles before hitting the Devil’s Bridge Trail junction.
Choose Chuck Wagon because you want a scenic hike and are uncomfortable or do not wish to walk Dry Creek Road!
Mescal Trail to Devil’s Bridge Trail
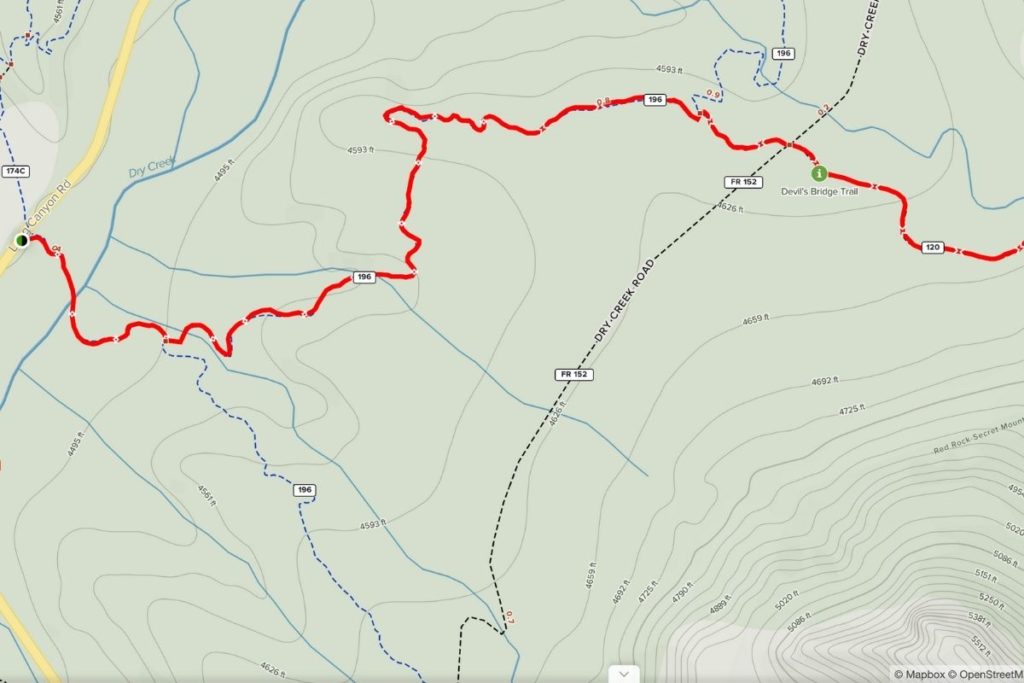
- Parking: 34.90181, -111.82673
- Shuttle Stop: Coming summer 2022. Head to SedonaShuttle.com
- Mescal Trail to Devil’s Bridge Trail: 1.2 miles one way
- Mescal Trail to Devil’s Bridge Trail to Devil’s Bridge: 2.2 miles one way; 4.4 miles RT
- Your Route: Mescal Trail > Chuck Wagon Trail > Devil’s Bridge Trail
Your third option for catching a Devil’s Bridge sunrise is to park at the Mescal Trailhead off Long Canyon Road and hike Mescal to Chuck Wagon to Devil’s Bridge. This is about a 4-mile round trip hike.
You will begin your hike from the Mescal Trailhead parking lot, and at about the 0.2 mile mark, you will follow the Mescal-Chuck Wagon Trail junction signs. You will then take the Chuck Wagon Trail about 1 mile to Devil’s Bridge Trail.
Here’s some truth: a few years ago, I decided to take the Mescal-Chuck Wagon Trail and ended up getting lost. While the trail is marked, it’s easy to miss the junction signs.
Choose to hike to your Devil’s Bridge sunrise via Mescal Trail if you want to take the scenic route and you’re comfortable with following trail junctions.
BONUS: Long Canyon Trail to Devil’s Bridge
If none of this floats your boat, you can also take Long Canyon Trail to Devil’s Bridge, which will be about a 7.2-mile hike. We won’t discuss the details here, BUT it is an option.
What to Expect on Devil’s Bridge Trail
Let’s now get into what hiking TO Devil’s Bridge looks like!
The Start of Devil’s Bridge Trail
For the duration of this blog and to keep things easy, we’re going to assume you are walking Dry Creek Road to Devil’s Bridge Trail. Remember, the road is bumpy and used by Jeep tours, so be careful getting there!
The Ascent to Devil’s Bridge
After 1.1 miles, you’ll finally come to what looks like a small dirt parking lot on your right, which is where Devil’s Bridge Trail starts. The rest of your hike to Devil’s Bridge trail will be steep and quite the thigh burner, if you ask me.
Don’t worry, though! It’ll be worth the climb.
From here, your hike will only be about 1 mile, so the thigh-burning shouldn’t be too bad.
Be on the lookout for a trail fork that allows you to go left or right. As if you didn’t already have enough “choose your adventure” decisions to make, here’s what you can expect with both sides of the fork.
Take a left at this fork, and you will be presented with a view from the bottom of Devil’s Bridge! A bottom view is a popular option for hikers who don’t like heights or folks who want a different perspective for photography purposes.
I have never been to the bottom; however, it’s on my list!
If you want to see the Bridge from the “classic” spot and get your Devil’s Bridge sunrise picture of you standing on it, take a right and continue your climb.
This trail will eventually feature steps made of stone that’ll bring you to the top, where your hike will be complete. And fin.
Arriving at Devil’s Bridge
Woohooo! After some off-roading on your feet and a bit of a climb, you’ll finally make it up to Devil’s Bridge. Will you step on the Bridge? Will you not? Spoooookyyyyyy.
Whaaaaattt willlllll youuuu chhooooooooseee? Haha. In reality, though, if you’re going to step on Devil’s Bridge for a picture, please be careful!

What to Bring with You
Now that we’ve gleaned your interest and you’re ready for a Devil’s Bridge sunrise hike, let’s go over what gear to bring on your adventure.
✨ Pack: sturdy hiking boots, a headlamp, a cute sun hat, sunscreen, a reusable water bottle, and sunglasses.
Sturdy Hiking Boots
Whether you’re getting to Devil’s Bridge Trail via Chuck Wagon, Mescal, or Dry Creek, these areas of Sedona can be bumpy. Wear sturdy hiking boots to prevent your toes from being knocked around.
A Headlamp
If you’re planning to hike Devil’s Bridge Trail for sunrise, 100% pack a headlamp with you. I typically bring my Petzl one with me everywhere.
You can also use a headlamp for your hike back down from Cathedral Rock, which is Sedona’s best sunset hike!
A Wide Angle Lens
Devil’s Bridge is about 45 feet long, which might not sound like much, but it is for your camera lens! I highly suggest bringing a wide-angle with you so that you can capture the whole scene with no issues.
I also like bringing my F2.8 24-70 lens for Sedona sunrise and sunset shots.
Final Tips for Hiking Devil’s Bridge for Sunrise
Now I want to bring your attention to some final Devil’s Bridge Trail details you should know before you go.
Parking is Limited
Devil’s Bridge Trail is one, if not THE most popular hike in Sedona. Unfortunately, parking is limited at all trailhead locations for Devil’s Bridge.
If you do not get to the parking lots for Devil’s Bridge Trail early, you most likely will not find parking.
If you don’t have time to do a Devil’s Bridge sunrise and must go mid-day, you might be able to find parking along the roads leading to the Devil’s Bridge trail! However, Sedona has been cracking down on this because of the hike’s popularity.
Remember, you might not be able to access the parking lots while the Sedona Shuttle is operating!
Be Patient
This shouldn’t be a shocker, but Devil’s Bridge is probably one of the most popular hikes in Sedona. It’s highly unlikely that you will be the only party enjoying this landmark, even at sunrise.
So be patient! Everyone gets a chance to walk across the Bridge, take pics, etc. Respect the fact that tourists are coming to enjoy this trail, and you’re one of them!
Devil’s Bridge is the perfect addition to any Sedona itinerary and a must if you find yourself on this side of the Southwest! If you’re planning a larger trip to Sedona, you might find these write-ups helpful:
- The Best Sedona Hikes for Sunrise and Sunset
- Sedona Travel Guide for First-Timers
- The Perfect Sedona 3 Day Itinerary
- Instagrammable Places in Sedona
Happy exploring!
